What Does Mouse Poop Look Like
Mouse droppings are one of the most common and easily identifiable signs of a rodent problem.

Recognizing what mouse poop looks like can help you detect an infestation early, preventing further damage and potential health risks.

These small, pellet-like droppings are often found near food sources, nesting areas, or along the paths mice travel.

Knowing how to identify and distinguish mouse poop from other types of rodent droppings is helpful to addressing the issue before it becomes a bigger problem.

Let’s take a deeper dive.

Mouse Poop Size, Shape, and Color

Mouse droppings are small, typically measuring between 1/8 and 1/4 inch in length, and are shaped like tiny pellets.

They are generally uniform in size, with pointed ends that distinguish them from the rounded or blunt droppings of other rodents. Fresh droppings are dark in color, often black or very dark brown, with a shiny, moist appearance.

As they age, mouse droppings dry out and become lighter in color, turning grayish or dusty brown, and their texture becomes hard and crumbly.

You’ll usually find these droppings scattered along walls, near food sources, or around areas where mice nest or travel frequently.

How Often Do Mice Poop?

Mice are frequent poopers, producing droppings throughout the day due to their high metabolism and constant eating habits.

On average, a single mouse can produce between 50 to 75 droppings per day. Because mice are small and constantly foraging, they tend to leave droppings wherever they travel, which means you’ll often find droppings scattered along their common paths or near food sources.

The frequency of mouse droppings per day, with estimates ranging from 50 to 75 droppings.

The frequent droppings are one of the clearest signs of an active infestation, as they accumulate quickly in areas where mice are feeding or nesting.

Regularly finding fresh droppings indicates the presence of active mice, signaling that immediate action is needed to control the situation.

Where to Find Mouse Droppings

Mouse droppings outside a house are a sign that rodents are active around the exterior, and it’s essential to address this before they make their way inside.

You can often find mouse droppings in areas like garages, sheds, and outdoor storage spaces, especially where food or garbage is stored. Around the foundation of the house, droppings may be found near gaps or cracks where mice might be entering.

Other common areas include around trash bins, garden beds, and under decks or porches, where mice might seek shelter.

If droppings are present near entry points or in outdoor spaces like these, it’s a good indication that mice are foraging nearby or nesting close to the home. Sealing entry points and maintaining clean, clutter-free outdoor areas can help prevent an infestation indoors.

Inside a house, mouse droppings are commonly found in areas where mice are active, such as behind appliances, inside cabinets, along baseboards, and in hidden corners where they travel or nest.

Kitchens, pantries, and attics are particularly prone to infestation since these areas offer easy access to food and shelter. You might find droppings in drawers, cupboards, or even under furniture.

In places with heavy mouse activity, you may notice multiple droppings clustered together, along with other signs such as gnaw marks on food packaging or wood, shredded nesting materials, and greasy rub marks along walls where mice travel frequently.

These indicators point to a more significant infestation, requiring immediate attention to prevent further damage.

For high quality mice control, contact H2 pest control

Does Mouse Poop Smell?

While mouse droppings themselves don’t produce a particularly strong odor, they can often be associated with a musty or unpleasant smell.

This smell is typically due to the urine and other waste products that accompany the droppings.

Additionally, if the droppings have been present for a prolonged period, they may decompose, releasing a more pungent odor. It’s important to note that this odor may be subtle, especially in small infestations, but it can become more noticeable as the infestation grows.

Cleaning Up Mouse Poop

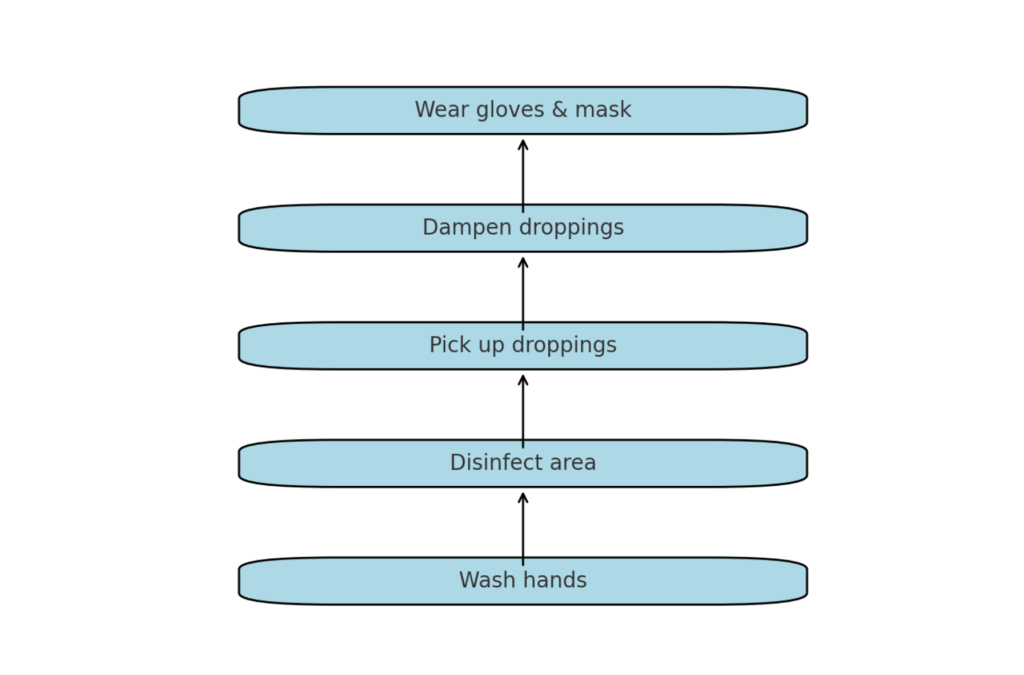
When cleaning up mouse poop, it’s essential to take precautions to avoid exposure to harmful bacteria and viruses that may be present.

Always wear gloves, and if possible, a mask to prevent inhaling dust particles. Avoid sweeping or vacuuming the droppings directly, as this can spread harmful particles into the air.

Instead, dampen the droppings and surrounding area with a disinfectant solution, then carefully pick them up using paper towels or a disposable cloth.

After disposal, thoroughly disinfect the area and wash your hands well with soap and water. It’s also important to check for other signs of infestation and seal any entry points to prevent further issues.

Steps involved in mouse poop cleanup.

The Dangers of Mouse Droppings

Mouse droppings can pose significant health risks to humans. They are often contaminated with harmful bacteria, such as salmonella, hantavirus, and E. coli.

These pathogens can cause various illnesses, including food poisoning, respiratory infections, and kidney failure.

Additionally, mice droppings can trigger allergic reactions in some individuals, leading to symptoms like sneezing, coughing, and itchy eyes.

It’s important to note that the risk of contracting a disease from mouse droppings increases with the severity of the infestation and the length of exposure.

Mice Poop FAQs

If you discover mouse droppings, it’s important to handle them carefully as they can pose health risks. Here are the steps to follow:

  • Ventilate the area: Open windows to allow fresh air to circulate for at least 30 minutes before cleaning.
  • Wear gloves and a mask: To avoid direct contact with droppings, use disposable gloves and a mask to protect against dust particles.
  • Do not sweep or vacuum: Sweeping or vacuuming can stir up harmful particles. Instead, spray the droppings with a disinfectant or bleach solution (1 part bleach to 10 parts water).
  • Wipe carefully: Use paper towels or disposable cloths to wipe up the droppings after spraying.
  • Dispose properly: Seal the waste in a plastic bag and dispose of it in a trash bin. Disinfect the area afterward.
  • Check for entry points: Inspect your home or area for any potential points where mice could be entering and seal them to prevent further infestations.

Yes, mice droppings can be harmful to humans. They can carry bacteria, viruses, and parasites, including:

  • Hantavirus: This is a potentially serious respiratory disease contracted through inhaling particles from infected mouse droppings or urine.
  • Salmonella: Contact with mouse droppings can spread salmonella, leading to food poisoning and gastrointestinal issues.
  • Leptospirosis: Mice urine and droppings can spread leptospirosis, a bacterial infection that can cause flu-like symptoms. It’s important to clean up mouse droppings properly to avoid health risks.

No, mice do not leave a single dropping. They can leave between 50 and 80 droppings per day. These droppings are usually scattered in areas where mice are active, such as along walls, near food sources, or in dark, hidden places. The presence of multiple droppings is often one of the first signs of a mouse infestation.

Mice are nocturnal creatures, meaning they are most active during the night when humans are less likely to see them. They are also very good at hiding and move quickly, which makes them hard to spot during the day. Even if you don’t see the mice themselves, the presence of droppings is a clear indicator that they are nearby and active in your space.

Slide

"My family has been an H2 customer for about 6 months. We built a home in Saratoga Springs, in an area that has a lot of insects and spiders. After seeing a few spiders in the house, we decided to use their services. They were prompt to respond, and very professional. I have not seen any spiders in our house since that time. We have called them for a few other issues (mice and may flies) and they always come right out and help. The staff are very friendly, very helpful and very professional. They never seem bothered by us calling and always ask us to call if something else is needed. They seem to value their customers very much, and they strive to provide a great product. I would highly recommend them based on my experiences."

-Brett H.

Slide

“These guys are seriously the best! We’ve worked with them since 2017 in our townhome in Eagle Mountain to now when we moved to Sandy! They just came to treat our new home and I feel so much better knowing we’re covered again!

We never saw any bugs at the last place, and two days after we told them we were worried about mice at the townhome, they were there taking care of it.

Amazing customer service and always very thorough!”

-Sierra M.

Mice: What They Eat and How to Keep Them Out

Mice have a knack for finding their way into our homes, causing damage, spreading disease, and generally making life unpleasant. But how do we effectively combat these intruders?

A crucial first step is understanding their dietary habits. 

Understanding what mice eat is crucial to preventing infestations and property damage. By knowing their food preferences, we can take steps to deprive them of sustenance, making our homes less attractive to these unwanted guests.

What Do Mice Eat?

Mice are adaptable creatures with diverse dietary habits. They are omnivores, meaning they consume both plant and animal matter.

This flexibility allows them to thrive in various environments, including human homes. In search of sustenance, mice will consume almost anything they can access.

Within and around homes, mice find a plentiful food supply. They are particularly drawn to kitchen areas where they can find a variety of tempting treats.

Common food sources include cereals, pasta, and bread. With a sweet tooth, mice are also attracted to sugary items such as chocolate and fruits. Additionally, they are not averse to protein, and may consume meat scraps or pet food left unattended.

In their quest for food, these resourceful rodents may even chew through packaging to access food. Mice are not picky eaters and will resort to consuming less desirable items like garbage, paper, or even soap when food is scarce.

What Do Mice Like to Eat the Most?

Mice have a preference for foods that provide them with quick energy to fuel their active lifestyles. High-energy foods are particularly appealing, as they allow mice to quickly replenish their energy stores for foraging, breeding, and evading predators.

As a result, mice are particularly fond of seeds, nuts, and grains. These food items are packed with calories and easily digestible, making them ideal for a mouse’s rapid metabolism. By understanding these preferences, homeowners can take steps to eliminate these attractive food sources from their living spaces, to reduce the likelihood of a mouse infestation.

What Keeps Mice Away?

To effectively deter mice, a multi-faceted approach is necessary.

First, eliminating their food sources is crucial. Proper storage of food items in airtight containers and diligent cleaning up of spills are essential.

Secondly, denying mice access to water is equally important. Fixing leaks, drying standing water, and ensuring pet water bowls are elevated can significantly reduce their attraction to your home.

Additionally, removing their shelter and nesting sites by sealing cracks and crevices around your home’s exterior will make it less inviting. To further discourage mice, consider using deterrents.

Natural repellents like peppermint oil, cayenne pepper, or white vinegar can be used strategically. Commercial repellents are also available, but it’s essential to choose products that are safe for humans, pets, and the environment.

By combining these strategies, homeowners can create an environment that is less appealing to mice and reduce the likelihood of an infestation.

In summary – follow these guidelines to keep mice away.

  • Deny access: seal entry points
  • Eliminate food sources: proper storage, clean up spills
  • Remove water sources: fix leaks, dry standing water
  • Deterrents: natural repellents, commercial products

How to Get Rid of Mice

If you’ve already have a mouse infestation, there are several effective methods to eliminate them. For severe infestations, it’s advisable to consult with professional pest control services. H2 has the expertise and tools to handle infestations efficiently and safely.

Slide

“We’ve been using H2 for about two years now. While neighbors have had trouble with mice/bugs (we live in new construction with a field behind the house, so it’s an expected issue), we’ve never had any infestations or issues.”

-Patrick R.

Slide

“We absolutely love H2 Pest Control! First of all, their monthly fee is super affordable, and it's only a monthly contract, so you can cancel at any time. We have never canceled even for a month. They come out once a month standard to spray, but if you need them more they will come back and each time, ours has been covered under our monthly fee. Their products are super safe, we have 2 little dogs and a toddler. They are always aware of our situation and provide solutions for everyone. They have helped us with mice in the garage, gophers, and ants and spiders etc. If you are looking for a pest control company, go with H2 Pest Control, you will not be disappointed."

-Josh and Kalisa E.

A more DIY approach involves using traps. Humane traps can be a valuable tool for capturing and releasing mice outside your property.

However, it’s crucial to place them strategically near areas where mice are frequently seen. Remember to dispose of captured mice far from your home to prevent them from returning.

Ultimately, the most effective way to deal with mice is through prevention. By diligently following the steps outlined above, such as eliminating food sources, removing water access, and sealing entry points, you can significantly reduce the likelihood of future infestations. Regular inspections and ongoing maintenance are key to preventing mice from reentering your home.

FAQs for “Mice: What They Eat and How to Keep Them Out”

Look for droppings, gnaw marks on food items or furniture, and small holes around your home’s exterior. You might also hear scratching noises at night, as mice are most active during darkness.
It’s best to avoid leaving any food sources readily available. However, mice are particularly attracted to high-energy foods like seeds, nuts, grains, sugary items, and pet food. Store these in airtight containers and clean up spills immediately.
Mice seek shelter and nesting materials. Seal any cracks or crevices around your foundation, windows, and doors. Additionally, eliminate clutter in your attic, basement, or garage, as these areas can provide nesting sites.
Yes! Humane traps allow you to capture mice and release them outside your property. However, placement is crucial for effectiveness. Consider using professional pest control services for severe infestations.
Prevention is key! Regularly inspect your home for potential entry points and seal them. Maintain proper food storage habits, clean up spills, and eliminate any potential water sources for mice. By creating an uninviting environment, you can significantly reduce the risk of future infestations.

For questions to common mice problems in Utah, contact H2 Pest Control or see the following links as resources:”

Slide

"My family has been an H2 customer for about 6 months. We built a home in Saratoga Springs, in an area that has a lot of insects and spiders. After seeing a few spiders in the house, we decided to use their services. They were prompt to respond, and very professional. I have not seen any spiders in our house since that time. We have called them for a few other issues (mice and may flies) and they always come right out and help. The staff are very friendly, very helpful and very professional. They never seem bothered by us calling and always ask us to call if something else is needed. They seem to value their customers very much, and they strive to provide a great product. I would highly recommend them based on my experiences."

-Brett H.

Slide

“These guys are seriously the best! We’ve worked with them since 2017 in our townhome in Eagle Mountain to now when we moved to Sandy! They just came to treat our new home and I feel so much better knowing we’re covered again!

We never saw any bugs at the last place, and two days after we told them we were worried about mice at the townhome, they were there taking care of it.

Amazing customer service and always very thorough!”

-Sierra M.

The Fastest Way to Get Rid of Mice

Mice can quickly become a significant problem in homes. Their presence can lead to a range of issues, from property damage to health risks.

If you’re dealing with a mouse infestation, it’s important to take swift and effective action. Effective and timely pest control is crucial to eliminate mice quickly and prevent future infestations.

Let’s explore the fastest and most efficient ways to rid your Utah home of these unwanted pests but first a quick look at the dangers of Mice.

The Dangers of Mice

Mice are known as carriers of various diseases, including salmonella, hantavirus, and typhus. Additionally, mice can trigger allergic reactions in some individuals.

Beyond health risks, mice can also cause substantial property damage. Their sharp teeth can gnaw through wires, insulation, and wood, leading to costly repairs.

The presence of mice can also create a stressful and unpleasant living environment, causing psychological distress for homeowners.

A visual that illustrates the impact of diseases, allergic reactions, property damage, and psychological stress that mice can cause.

DIY Pest Control: A Limited Solution

While DIY pest control methods, such as traps and repellents, may seem like a convenient and cost-effective solution, they often have significant limitations.

Traps can be effective in capturing individual mice, but they may not address the underlying cause of the infestation. Additionally, DIY methods can be time-consuming and require consistent effort to maintain.

Repellents may temporarily deter mice, but they often provide only short-term relief and may not be effective against persistent infestations.

Furthermore, DIY methods may not address the root causes of the problem, such as entry points or nesting sites, leading to recurring infestations. In many cases, professional pest control services offer a more comprehensive and effective solution for eliminating mice and preventing future infestations.

For high quality mice control, contact H2 pest control

Professional Pest Control: The Fastest and Most Effective Solution

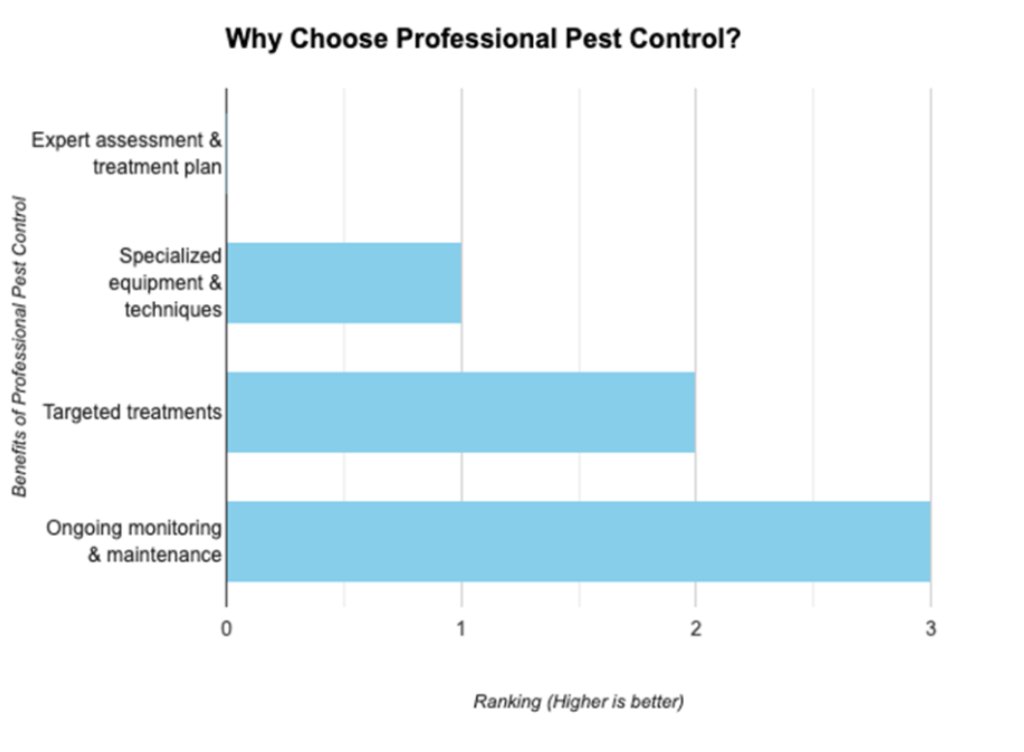
Hiring a professional pest control company offers several advantages over DIY methods.

Experienced technicians have the expertise and knowledge to accurately assess the extent of the infestation and develop a tailored treatment plan.

They use specialized equipment and techniques to eliminate mice efficiently and effectively.

The process involves an initial inspection to identify entry points, nesting sites, and potential food sources.

Following the inspection, the technicians will apply targeted treatments to eliminate existing mice and prevent future infestations. Additionally, professional pest control companies often provide ongoing monitoring and maintenance services to ensure long-term pest control.

When choosing a pest control company, consider factors such as certifications, experience, and customer reviews. A reputable company will have the necessary qualifications and a proven track record of success.

Prevention is Key

To prevent future mouse infestations, it’s essential to take proactive measures.

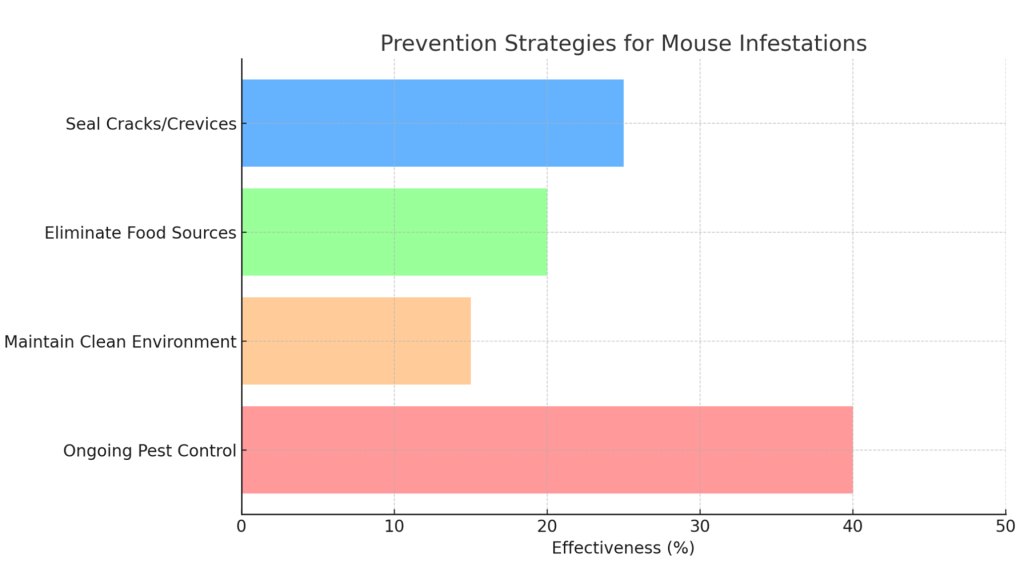
Sealing any cracks or crevices around your home’s exterior, particularly around windows, doors, and foundations, can prevent mice from entering.

Eliminating potential food sources is also crucial. Store food items in airtight containers, clean up spills promptly, and avoid leaving crumbs or pet food accessible.

Additionally, maintaining a clean and clutter-free environment can make your home less attractive to mice.

While DIY measures can help, ongoing pest control services play a vital role in prevention. Regular inspections and maintenance by professionals can identify potential vulnerabilities and address them before they become a problem.

By combining prevention strategies with professional pest control, you can significantly reduce the risk of future mouse infestations.

Bar chart representing the effectiveness of various prevention strategies for mouse infestations.

Don’t Let Mice Take Over Your Utah Home!

Mice problems can be significant. From health risks like disease and allergies to property damage and unwanted stress, a mouse infestation is an issue that requires a swift and effective solution.

While DIY methods may seem tempting, professional pest control offers the fastest and most comprehensive approach. Experienced technicians can eliminate existing mice and prevent future infestations with targeted treatments and ongoing monitoring.

Don’t wait until a minor problem becomes a major headache! Take action today and contact H2 Pest Control for high-quality mice control services in Utah. Their expertise and proven track record will ensure your home remains a haven for you and your family, not unwanted pests.

For questions to common mice problems in Utah, contact H2 Pest Control or see the following links as resources:

Slide

"My family has been an H2 customer for about 6 months. We built a home in Saratoga Springs, in an area that has a lot of insects and spiders. After seeing a few spiders in the house, we decided to use their services. They were prompt to respond, and very professional. I have not seen any spiders in our house since that time. We have called them for a few other issues (mice and may flies) and they always come right out and help. The staff are very friendly, very helpful and very professional. They never seem bothered by us calling and always ask us to call if something else is needed. They seem to value their customers very much, and they strive to provide a great product. I would highly recommend them based on my experiences."

-Brett H.

Slide

“These guys are seriously the best! We’ve worked with them since 2017 in our townhome in Eagle Mountain to now when we moved to Sandy! They just came to treat our new home and I feel so much better knowing we’re covered again!

We never saw any bugs at the last place, and two days after we told them we were worried about mice at the townhome, they were there taking care of it.

Amazing customer service and always very thorough!”

-Sierra M.

Can Mice Climb Walls? Don’t Let Them Invade Your Home!

Can Mice Climb Walls?

Mice are notorious for finding their way into homes, often climbing walls to reach food or nesting sites.

This blog post aims to provide a clear answer to whether mice can climb walls and offer practical advice to prevent them from doing so.

The Short Answer: Yes, Mice Can Climb Walls

Yes, mice are capable of climbing walls. Their physical characteristics and natural instincts make them skilled climbers.

Whether it’s rough brick or textured plaster, mice can use their sharp claws, adhesive pads, and agile bodies to scale vertical surfaces.

How Can Mice Climb?

Several unique traits enable mice to climb so effectively:

  • Claws: Mice have sharp, curved claws that act like tiny grappling hooks, allowing them to grip rough surfaces like bricks, wood, and even some fabrics. These claws are instrumental in digging into tiny cracks or edges on vertical surfaces.
  • Pads: Mice have sticky pads on the bottoms of their feet, which give them the ability to cling to smooth surfaces more easily. These pads help them maintain contact and improve friction, even on slightly slicker walls.
  • Tail: The mouse’s long tail serves as a counterbalance, aiding its agility and balance when navigating narrow ledges or uneven terrain. The tail helps them stabilize while climbing and prevents them from falling backward.
  • Friction: Mice rely on the concept of friction to help them stick to surfaces. The more textured the surface, the more friction mice can generate, making it easier to climb. This is why you’ll often see them on brick walls or stucco.

Remember, a mice-free home is a healthy and comfortable home. Contact H2 Pest Control today for peace of mind and top notch mice control.

Factors Affecting Climbing Ability

Several factors can impact how well a mouse can climb a wall:

  • Surface Texture: Mice can easily climb rough surfaces like brick, stucco, or wood because their claws can grip onto these materials. However, smoother surfaces like glass or metal are much more challenging for them.
  • Mouse Species: Not all mice are equal climbers. House mice are especially skilled at climbing compared to some other species, like field mice, which are more adapted to burrowing.
  • Mouse Age and Health: Young, healthy mice are far more agile climbers than older or unwell ones. As they age or if they are sick, their agility and strength diminish, which can affect their climbing ability.


Preventing Mice from Climbing Walls

Now that we know mice can scale walls, here are some practical steps to deter them:

  • Seal Entry Points: Inspect your home for cracks or small holes that mice could use to enter. Seal these entry points with caulk, steel wool, or metal mesh to block their access.
  • Use Deterrents: Natural repellents like peppermint oil or commercial mouse deterrents can help keep mice away. These products create smells or barriers that discourage climbing and movement in general.
  • Regular Cleaning: Mice are always on the hunt for food and water. Keeping your kitchen, pantry, and home clean by storing food in sealed containers and removing any crumbs or spills makes your home less appealing to these critters.
  • Mice Pest Control – Mice pest control is essential for preventing infestations by eliminating existing mice and addressing the conditions that attract them. Effective pest control not only removes current infestations but also helps prevent future problems, reducing the risk of property damage, contamination, and health hazards associated with mice.

FAQs About Mice Climbing Walls

Mice generally have difficulty climbing smooth walls like glass or polished metal because they can’t get a good grip. However, they can scale slightly textured surfaces or find nearby objects to help them climb.
Yes, mice can climb into your bed if there are nearby objects or fabrics they can use to reach it. They are skilled at climbing fabrics like blankets or curtains, which can help them gain access to elevated surfaces like a bed.
Mice can climb painted walls if the texture allows them to get a foothold. If the paint is on a rough surface like brick or wood, they will have little trouble climbing. However, on smooth, glossy painted surfaces, they may struggle to climb effectively.
Mice can climb walls if they have enough texture to grip, but ceilings are much harder for them to scale unless the surface is particularly rough. They usually don’t climb upside down on ceilings, but they may find ways to reach high areas via ledges or nearby objects.
Yes, mice can easily climb stairs. Their small bodies and agility allow them to navigate steps and different levels with no trouble at all, whether indoors or outdoors.
Yes, mice are surprisingly good jumpers. They can leap up to a foot vertically and cover several feet horizontally. This ability allows them to reach high places or escape from traps.

For questions to common mice problems in Utah, contact H2 Pest Control or see the following links as resources:

Slide

"My family has been an H2 customer for about 6 months. We built a home in Saratoga Springs, in an area that has a lot of insects and spiders. After seeing a few spiders in the house, we decided to use their services. They were prompt to respond, and very professional. I have not seen any spiders in our house since that time. We have called them for a few other issues (mice and may flies) and they always come right out and help. The staff are very friendly, very helpful and very professional. They never seem bothered by us calling and always ask us to call if something else is needed. They seem to value their customers very much, and they strive to provide a great product. I would highly recommend them based on my experiences."

-Brett H.

Slide

“These guys are seriously the best! We’ve worked with them since 2017 in our townhome in Eagle Mountain to now when we moved to Sandy! They just came to treat our new home and I feel so much better knowing we’re covered again!

We never saw any bugs at the last place, and two days after we told them we were worried about mice at the townhome, they were there taking care of it.

Amazing customer service and always very thorough!”

-Sierra M.

How to Get Rid of Black Widow Spiders: Expert Techniques

Black widow spiders, known for their distinctive markings and potent venom, are unwelcome guests in any home.

Understanding how to identify, locate, and effectively eliminate these spiders is crucial for maintaining a safe living environment.

This comprehensive guide provides insights into professional techniques for dealing with black widow spiders.

Recognizing a Black Widow Spider

Identifying Features of Black Widow Spiders

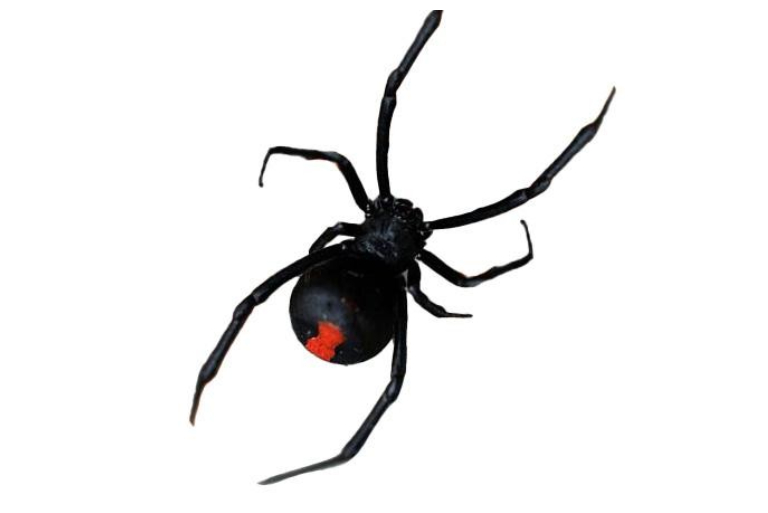
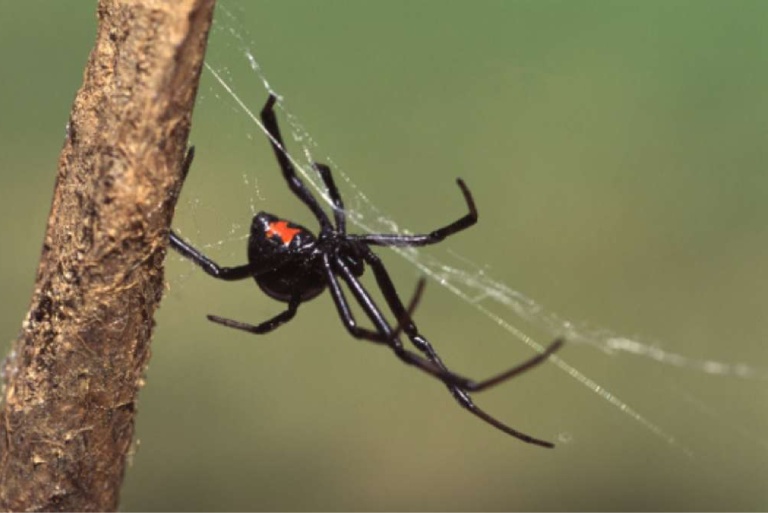
Black widows are easily recognizable by their shiny black bodies and the red hourglass shape on their abdomens. Females, typically larger than males, can reach up to 1.5 inches in size when their legs are fully extended.

Locating Black Widow Habitats

Prime Locations for Black Widow Spiders

Black widows prefer dark, secluded areas. Indoors, they might be found in garages, basements, and cluttered closets. Outdoors, they favor sheds, under rocks, and woodpiles.

Indoors

Outdoors


How to Get Rid of Black Widows Effective Methods

Utilizing Chemical Agents

Pesticides: Chemical Solutions

  • Pesticides designed specifically for spiders can be effective in areas where black widows are spotted.

Dust Applications: Targeted Treatments

  • Applying insecticidal dust in cracks and crevices can target hidden spiders without spreading chemicals throughout your home.

Spray Contacts: Immediate Effects

  • Direct contact sprays provide a quick solution for visible spiders, delivering lethal doses to black widows on contact.

Natural Habitat Adjustments

Structural Barriers: Preventing Entry

  • Sealing cracks and openings around doors, windows, and foundations can prevent black widows from entering the home.

Environmental Management: Deterring Habitats

  • Removing clutter and debris from around the home reduces hiding spots for spiders, making your space less attractive to them.

The bar chart compares the assumed effectiveness of different eradication methods, showing that chemical agents are considered the most effective, followed by natural habitat adjustments, and eco-friendly remedies.

Natural Strategies to Combat Black Widows

Eco-Friendly Remedies for Black Widow Spiders

In the quest to manage black widow spider populations within and around our homes, many seek solutions that are both effective and environmentally friendly.

Utilizing natural substances, particularly essential oils, has emerged as a popular method for deterring these potentially dangerous spiders without resorting to harsh chemicals.

Below are some eco-friendly strategies and the specific essential oils that can be used as natural deterrents against black widow spiders:

  • Peppermint Oil: Known for its strong scent, peppermint oil is a potent natural repellent. The aroma is not only unpleasant to black widow spiders but also to a variety of other pests. To use, mix a few drops of peppermint oil with water in a spray bottle and apply it around areas where spiders are suspected to hide or enter the home, such as windowsills, doorways, and basement corners.

  • Tea Tree Oil: This oil possesses strong antimicrobial properties and a scent that’s equally disliked by spiders. Similar to peppermint oil, dilute tea tree oil with water and spray it in areas prone to spider activities. Its strong scent serves as an effective barrier against black widow encroachments.

  • Citrus Oils: Extracts from citrus fruits, such as lemon, orange, and grapefruit, are also known to repel spiders. The bright, acidic scent of citrus oils can help keep black widow spiders at bay. Wipe down surfaces or spray diluted citrus oil in spider-frequented areas for a natural deterrent effect.

  • Eucalyptus Oil: Another essential oil with a potent aroma that spiders find unfavorable. Eucalyptus oil not only repels spiders but can also provide a refreshing scent to your home. Use it as a spray in outdoor areas like garages, sheds, and around the perimeter of the house to prevent spiders from entering.

  • Vinegar Solution: While not an essential oil, a solution of vinegar and water can also act as an effective spider repellent. The acetic acid in vinegar is unpleasant to spiders, making it a great natural spray for areas where spiders gather.

By incorporating these eco-friendly remedies into your pest management strategy, you can reduce the presence of black widow spiders around your home.

Regular application and maintenance of these natural deterrents can provide a safer, chemical-free approach to controlling unwanted spider populations.

Removing Black Widows from Indoor Spaces

Strategies for Indoor Black Widow Elimination

Regular vacuuming and dusting, particularly in less-frequented areas of the home, can remove spiders and their webs, disrupting their living environment.

Close up of black widow in a web

Addressing Outdoor Black Widow Populations

Techniques for Exterminating Outdoor Black Widows

Keeping yards clean, trimming vegetation away from the house, and using outdoor pesticides can reduce outdoor populations of black widows.

Key Considerations in Black Widow Removal

Essential Advice for Successful Black Widow Control

Patience and persistence are key. Regularly inspecting and cleaning your home, along with targeted chemical or natural treatments, can effectively control black widow populations.

Safeguarding Against Black Widow Spiders

Proactive Measures to Deter Black Widow Spiders

Maintaining a clean and clutter-free home and yard is the best defense against black widow spiders, alongside regular perimeter treatments with pesticides.

Professional Intervention for Severe Infestations

When to Seek Expert Help for Black Widow Issues

If infestations persist or you find black widow spiders frequently inside your home, it may be time to call in professional pest control services to manage the problem safely and effectively.

H2 Pest Control offers the best in class black widow control. Contact H2 Pest Control Today!

Frequently Asked Questions: Tackling Black Widow Concerns

  • Direct contact pesticides and thorough environmental management are the most immediate solutions.
  • Seal entry points, maintain a clean environment, and use natural deterrents to prevent black widow invasions.
  • Black widows seek out dark, undisturbed areas where they can find food and shelter, making cluttered and rarely cleaned spaces particularly attractive to them.

By following these expert techniques and making a few adjustments to your home and habits, you can significantly reduce the risk of black widow spiders making a home in your space.

How Long Do Mice Live – A Helpful Guide

Mice, with their quick movements and keen survival instincts, play a significant role in the ecosystem and sometimes, unfortunately, in our homes. This article delves into the lifespan of mice, exploring how various factors, including environment and species, affect their longevity.

The Journey from Birth to Adulthood

From Baby to Adult: The Growth Stages of a Mouse

  • Baby Mice: These tiny creatures are born blind, hairless, and utterly dependent on their mother for warmth and nutrition. This critical period lasts about two weeks, during which they rapidly develop.
  •  Juvenile Mice: As they grow, mice enter a stage of rapid development, gaining fur and sight. This phase marks their transition from helpless infants to more independent beings, ready to explore their surroundings.
  •  Adult Mice: Mice reach adulthood around the age of six weeks. As adults, they become capable of reproduction, contributing to the rapid growth of their population.
Chart Breakdown: Life Stages of a Mouse, breaking down the journey from baby mice, through juvenile mice, to adult mice. It visualizes the number of days each stage typically lasts.

Lifespan Variations

How Environment Influences Mouse Lifespan

  • Wild Mice: In nature, mice face numerous threats, from predators to harsh weather. Despite these challenges, they can live for about 12 to 18 months, a testament to their resilience.

  • Domestic Mice: Inside the safety of a home or laboratory, mice are shielded from predators and environmental extremes, allowing them to live longer, often up to 2 to 3 years.

Chart Breakdown: Mouse Lifespan in Different Environments, contrasting the average lifespan of mice living in the wild with those residing indoors. It highlights how environmental conditions significantly impact their longevity, with mice generally living longer in indoor environments where threats are minimized.

Survival Without Essentials

  • Without Water: Mice are highly dependent on a regular water intake to survive. A mouse can only live a few days without water, highlighting the importance of hydration for their survival.

  • Without Food:Food scarcity is a critical survival challenge for mice. They can survive slightly longer without food than water, managing up to a week under such conditions.

Chart Breakdown: Survival Without Essentials, illustrates the critical survival times for mice without water and food. It shows the number of days a mouse can survive without these vital resources, emphasizing the importance of water and food for their survival.

Species-Specific Lifespan

Different species of mice have varying lifespans, influenced by their genetics and living conditions. For example, the common house mouse typically lives up to 2 years under optimal conditions, while other species may have shorter or slightly longer lifespans.

Chart Breakdown: Mice Lifespan by Species, showcases the average lifespan of various mouse species, such as the house mouse, field mouse, and deer mouse. This visualization highlights the diversity in lifespan across different species.

Health Challenges

Mice are susceptible to various illnesses, which can significantly impact their lifespan. Diseases and parasites can spread rapidly through mouse populations, especially in cramped conditions.

The Significance of Mice in Human Spaces

While mice play a vital role in ecosystems as part of the food chain, their presence in human dwellings can pose health risks and structural damage, making it crucial to understand how to manage their populations effectively.

Mitigating Mouse Populations

Preventive Measures Against Mice

Maintaining cleanliness, securing food sources, and blocking entry points are effective strategies to prevent mice infestations. Regular home maintenance and vigilance can significantly reduce the likelihood of mice finding a hospitable environment in human dwellings.

Professional Intervention

If mice become a persistent issue, seeking professional pest control services, such as H2 Pest Control, can offer a comprehensive solution to eliminate and prevent future infestations.

Don’t let mice become unwelcome guests in your home. If you suspect a mice infestation, it’s crucial to take action swiftly.

Early intervention by H2 Pest Control can prevent costly damage and potential health risks. We have the expertise and resources to effectively eliminate mice and seal entry points to prevent future invasions.

Remember, a mice-free home is a healthy and comfortable home. Contact H2 Pest Control today for peace of mind and top notch mice control.

Frequently Asked Questions About Mice Lifespan

  • Mice living in the wild typically have a shorter lifespan compared to those in captivity, averaging between 12 to 18 months. Their life expectancy is significantly impacted by factors such as predation, competition for food, and environmental conditions.
  • Mice living in the wild typically have a shorter lifespan compared to those in captivity, averaging between 12 to 18 months. Their life expectancy is significantly impacted by factors such as predation, competition for food, and environmental conditions.
  • Yes, the species of a mouse can influence its lifespan. Different species have varied genetic makeup that can affect their overall health and longevity. For example, the common house mouse (Mus musculus) typically lives around 2 years in captivity, while other species may have slightly different lifespans.
  • Several factors influence a mouse’s lifespan, including its diet, living conditions, access to clean water, and the absence of diseases. Proper nutrition, a clean and safe habitat can significantly increase their lifespan.
  • Mice are highly dependent on a regular supply of food and water. They can survive without food for about 2 to 4 days, but their survival without water is much more limited, usually only 1 to 2 days. This highlights the importance of constant access to water for their survival.
  • Mice are susceptible to various illnesses that can shorten their lifespan, such as respiratory infections, tumors, and parasites.

How Long Do Ants Live

Exploring the Lifespan of Ants:

The longevity of an ant is influenced by a myriad of factors, ranging from its species to its specific role within the colony’s social structure.

The most significant variable affecting an ant’s lifespan is its caste system, which dictates the duties an ant performs within its community.

This caste system is determined by genetic factors from the queen ant and the nurturing environment provided by worker ants, which includes feeding and caring for ant larvae. The queen ant plays a crucial role in this process by selectively fertilizing eggs, while worker ants cater to larvae’s nutritional needs, steering them towards their future roles within the colony.

Each caste within an ant colony experiences a different lifespan, with queen ants capable of living for decades under the right conditions.

Egg Stage: The journey of an ant begins as an egg. This phase lasts about 1 to 2 weeks, during which the foundation for caste differentiation is laid. The queen’s selective fertilization decides whether an egg will develop into a female worker, soldier, or alate (future queen or male drone), with unfertilized eggs developing into male drones.

Larval Stage: Following the egg stage, ants enter the larval phase, characterized by their legless, blind state. Here, they rely entirely on worker ants for nourishment. Lasting 1 to 2 weeks, this stage is pivotal for caste differentiation, influenced by the diet and pheromonal exposure. A colony’s composition, typically 95% workers and 5% soldiers, is maintained through a balance of nutritional provisioning and pheromonal regulation.

Pupal Stage: The pupal stage marks the transition towards adulthood, with ants taking on the appearance of their mature form but remaining inactive. This stage can last from one to four weeks, culminating in the emergence of an adult ant ready to fulfill its role within the colony.

Adult Stage: Upon reaching adulthood, an ant assumes its role as a worker, soldier, drone, or alate, with its lifespan now subject to factors like environmental conditions and availability of resources.

Factors Influencing Ant Lifespans

Several elements play a role in determining the lifespan of ants:

  • Species: Lifespans vary significantly across ant species.

  • Gender: Male ants typically live for about a week post-maturity, as their primary function is to mate with queens. Female ants, constituting the majority of the colony, have longer lifespans, varying by caste and species.

  • Caste: The queen, workers, soldiers, and alates each have distinct lifespans, reflecting their roles within the colony.

  • Resources: The availability of food and water is crucial for colony survival, with scarcity leading to reduced lifespans.

  • Environment: The habitat’s suitability can greatly affect an ant’s survival, with adverse conditions shortening lifespans.

  • External Threats: Predators, environmental hazards, and human interventions can prematurely end an ant’s life.

Caste-Specific Lifespans

  • Queen Ants: Serve as the colony’s reproductive foundation, with some species’ queens living between 10 to 28 years.

  • Worker Ants: Form the majority of the colony, with lifespans ranging from a few months to several years, depending on species.

  • Soldier Ants: Often face early mortality due to their protective duties.

  • Drones and Alates: Drones live briefly after mating, while alates venture to establish new colonies.

Species Variations in Lifespan

Ant species exhibit diverse lifespans, with examples including:

  • Carpenter Ant Workers: Up to 7 years

  • Pharaoh Ant Workers: Approximately 70 days

  • Black Garden Ant Queens: 15+ years

Sustenance and Survival

Ants’ ability to survive without food or water varies, with workers potentially lasting 1-2 weeks without food. Water deprivation studies suggest ants can survive around 5 days without hydration.

Seeking Professional Ant Control

If ant presence becomes a concern, professional extermination services like H2 Pest Control can offer solutions tailored to effectively address and prevent ant infestations.

Contact H2 Pest Control Today

FAQs on Ant Lifespan

Typical ant workers live from a few months to a few years, depending on their species. Soldier ants may have shorter lifespans due to their role, while queen ants can live significantly longer, often up to 10 to 20 years under optimal conditions.
It’s rare but possible for ant queens in some species to live up to or even exceed 30 years in ideal circumstances. However, this is more the exception than the rule, with most ant queens living between 10 and 20 years.
Ants can survive without food for 1 to 2 weeks and without water for approximately 5 days, though this can vary based on species and environmental factors.

How To Keep Bees Away

Bees are vital to our ecosystems, acting as essential pollinators that support biodiversity and agricultural productivity. However, their stinging ability can pose risks, particularly to individuals with allergies.

To coexist peacefully with bees, adopting preventive measures to discourage their presence without harming them is beneficial. By leveraging natural repellents, we can create bee-free zones while preserving these crucial insects.

Effective Strategies for Bee Repulsion

Understanding bees’ behavior and preferences allows us to employ methods that naturally deter them, utilizing their acute olfactory senses to our advantage. Here’s how:

Safeguard Food and Beverages

  • Secure Consumables: Bees are drawn to the aroma of ripe fruits and sugary drinks. Ensuring food and beverages are covered or sealed, especially outdoors, can significantly reduce bee attractions.

Minimize Attraction

  • Reduce Sweet Scents: Bees are attracted to the sugary aroma of nectar, making them prone to investigating similar sweet smells from perfumes, lotions, and sunscreens. Opting for products with subtle or unscented formulations can help avoid drawing bees.

Alter Habitat to Discourage Bees

  • Modify the Environment: Limiting resources such as water and preferred floral types can make an area less appealing to bees, encouraging them to seek more hospitable environments.

Innovative Repellents

  • Utilize Vinegar & Spices: Vinegar’s strong odor can serve as a repellent, as can sprinkling cinnamon or cayenne pepper in areas where bees are unwelcome. However, it’s essential to apply these remedies judiciously to avoid harm to bees.

Block Entry Points

  • Seal Potential Nests: Prevent bees from establishing nests in undesired locations by sealing cracks and openings around your home.

Natural Repellent Plants

Cultivate Bee-Repelling Flora: Certain plants emit odors that bees find off-putting. Surrounding your space with these can serve as a natural barrier:

    • Marigolds

    • Geraniums

    • Mint varieties

    • Eucalyptus

    • Thyme

    • Lemon balm

    • Pennyroyal

    • Neem

    • Clove

    • Garlic

    • Basil

    • Lavender

Essential Oils as Deterrents

  • Diffuse Bee-Averse Scents: Essential oils derived from the above plants can amplify the repelling effect when used in diffusers or applied around areas you wish to keep bee-free:

    • Lavender oil

    • Tea tree oil

    • Citronella oil

    • Lemon oil

    • Peppermint oil

    • Clove oil

    • Eucalyptus oil

    • Cinnamon oil

    • Cedarwood oil

The Importance of Bee Conservation

Despite the occasional inconvenience bees may present, their role in pollination is irreplaceable, supporting the survival of many plants and, by extension, the broader ecosystem.

Efforts to repel bees should aim for harmony, not harm, ensuring their vital work continues.

Professional Bee Management

In cases where bees pose a significant problem, consulting with bee removal experts is recommended. Professionals can safely relocate bees, ensuring both human safety and the preservation of bee populations.

Bee Repellent FAQs

  • How to Deter Bees? Employ a combination of the strategies mentioned above, focusing on altering scents, securing food sources, and modifying the habitat.

  • What Smells Do Bees Dislike? Bees are repelled by strong, pungent smells such as garlic, lavender, citronella, and mint, among others listed in the essential oils section.

Contact H2 Pest Control to Professional Handle Bee Removal

How to Remove a Wasp Nest: A Step-by-Step Guide

Dealing with a wasp nest near your home can be nerve-wracking.

Whether you’ve spotted one in your garden, under the eaves, or near a window, it’s important to approach the situation with caution.

This guide aims to guide you through how to remove a wasp nest safely and effectively.

Step 1: Identify the Nest

Before taking any action, it’s crucial to confirm that you’re dealing with a wasp nest. Wasp nests are typically made of a papery substance and can vary in size.

They are often found in sheltered spots like under eaves, in attics, or in wall cavities. Correctly identifying the nest will help you choose the best removal method.

Step 2: Safety First

Safety is paramount when dealing with wasps. Wear protective clothing, including long sleeves, pants, gloves, and a face mask or veil.

Wasps can become aggressive if they feel their nest is threatened, so it’s vital to protect yourself from potential stings, especially if you are allergic.

Step 3: Choose the Right Time

Wasps are less active during the cooler hours of the day. Plan to remove the nest at night or early in the morning. This minimizes the risk of agitating the wasps and reduces the likelihood of being stung.

Step 4: Prepare Your Approach

If the nest is small and within reach, you may be able to remove it yourself using over-the-counter insecticides. Be sure to read and follow the manufacturer’s instructions carefully.

For nests that are large or in hard-to-reach places, consider calling a professional. Pest control experts have the necessary equipment and experience to safely remove the nest.

Step 5: Applying Insecticide

If you choose to remove the nest yourself, apply the insecticide directly to the nest’s entrance.

Be cautious and avoid inhaling the chemicals. It’s advisable to have an escape route planned in case the wasps become aggressive.

Step 6: Remove the Nest

After the wasps have been eliminated, which may take a day or two, you can proceed to remove the nest. Using a long tool, gently knock down the nest and dispose of it in a sealed bag.

Step 7: Post-Removal Care

After removing the nest, clean the area thoroughly to prevent other wasps from being attracted to the site.

Seal any openings or cracks that the wasps used to build their nest to prevent future infestations.

Step 8: Preventive Measures

Prevention is key to avoiding future wasp nest problems. Regularly inspect your property for early signs of nest-building, seal potential entry points, and keep outdoor areas clean from food sources that might attract wasps.

See our guide on how to keep wasps away

Removing a wasp nest can be a daunting task, but by following these steps, you can do it safely and effectively. Remember, if the nest is large or difficult to access, it’s always safer to call in the professional for wasp nest removal.

Stay safe and be proactive in preventing future wasp issues on your property.

By understanding how to remove a wasp nest, you can tackle the problem confidently and safely. Remember, the key is to be cautious, prepared, and if in doubt, seek professionals like H2 pest control for help.

Keeping Wasps Away from Hummingbird Feeders

Hummingbird feeders are a great addition to any garden, inviting the mesmerizing flutter of these tiny birds. However, they often attract unwanted visitors – wasps.

These insects not only scare away the hummingbirds but also pose a sting risk.

Fortunately, there are effective ways to enjoy hummingbird watching without the nuisance of wasps.

1. Choose the Right Feeder: Start by selecting a feeder designed to deter wasps. Opt for models with bee guards or feeding ports that are too small for wasps to enter. Some feeders also come with a moat that can be filled with water to prevent wasps from reaching the nectar.

2. Maintain Cleanliness: Regularly clean your feeders to prevent the buildup of sweet residues that attract wasps. A clean feeder is less likely to lure these pests. Rinse the feeder with hot water and scrub it thoroughly every few days.

3. Perfect Placement: Place the feeder in a shady spot. Wasps generally prefer sunnier locations, so a feeder in the shade can be less appealing to them while still attractive to hummingbirds.

4. Use Multiple Feeders: Spreading out multiple feeders can help. With more options, hummingbirds won’t be crowded out by wasps congregating at a single feeder. This also dilutes the concentration of wasp activity.

5. Avoid Yellow: Wasps are attracted to the color yellow. Therefore, avoid feeders with prominent yellow parts or decorations. Opt for red feeders instead, as hummingbirds are attracted to red, but wasps are not.

6. Implement Wasp Traps: Set up wasp traps around your garden to capture them before they reach the feeders. Ensure these traps are placed away from the feeders so as not to draw more wasps towards them.

7. Apply Mint Oil: Wasps dislike the smell of mint. Rubbing or spraying peppermint oil around the feeder can help keep them at bay. Ensure the oil doesn’t contaminate the nectar, as it can be harmful to hummingbirds.

8. Adjust the Nectar Recipe: Slightly altering the sugar concentration in your homemade nectar can make it less appealing to wasps. Try using a ratio of 5 parts water to 1 part sugar instead of the standard 4:1 ratio.

9. Create a Distraction: Provide an alternative food source for wasps away from the hummingbird feeders. A small plate of overripe fruit or a sugar-water mixture in a different part of the garden can attract wasps away from the feeders.

10. Regular Monitoring: Keep an eye on your feeders to identify and address wasp problems early. Immediate action can prevent wasps from establishing a pattern of visiting the feeder.

With a combination of the right feeder design, strategic placement, regular maintenance, and a few deterrents, you can successfully keep wasps away from your hummingbird feeders.

This approach ensures a peaceful and safe environment for both you and the delightful hummingbirds you wish to attract.